
How to Fix a Crooked Press-On Nail (Without Ruining Your Mani)
Quick fix: If the adhesive is still fresh, use cuticle oil to help loosen the press-on, then gently remove and realign it. If the glue has fully dried, carefully file the sides and free edge to make the nail look straighter without disturbing the bond.
Just finished applying your press-on nails and noticed one is crooked? You don’t necessarily need to remove your entire manicure. The right fix depends on whether you used adhesive tabs or liquid nail glue, how firmly the nail is attached, and how far out of alignment it sits.
Start here: If the nail is comfortable and only slightly crooked, try reshaping it. If it is visibly misaligned, lifting, or uncomfortable, focus on gentle removal and reapplication rather than forcing it into place.

Table of Contents
Step 1: Assess the Damage (Glue vs. Adhesive Tabs)
Before you try to straighten the nail, take a close look at its position. Is only the tip slightly angled, or is the entire press-on attached diagonally?
Check the nail from directly above, with your hand resting on a flat surface. Compare the center of the artificial nail with the direction of your finger. If the press-on is only slightly uneven, filing may be all you need.
If You Used Adhesive Jelly Tabs
Adhesive jelly tabs are often easier to remove than liquid nail glue, particularly when the press-on was recently applied.
- Apply a small amount of cuticle oil around the nail edges.
- Allow the oil to work around the adhesive.
- Gently test whether the press-on moves without resistance.
- If the adhesive releases easily, remove the press-on.
- Remove the old adhesive tab, clean and dry the surfaces, and apply a fresh tab.
- Check the alignment before pressing the nail firmly into place.
Never pull upward if the nail is still firmly attached. For more about adhesive alternatives, read our guide to no-glue press-on nails, which covers options for applying artificial nails without liquid glue.
If You Used Liquid Nail Glue
Liquid nail glue can create a strong bond that becomes difficult to adjust once cured. Trying to twist or slide a fully bonded press-on can pull against the natural nail underneath.
If the nail is secure, comfortable, and only slightly crooked, use the filing method below. If it is badly positioned, remove it using a method compatible with your adhesive before reapplying.
If you plan to keep and wear the same set again, our reusable press-on nails guide offers additional context on choosing and caring for reusable designs.
Method 1: The Quick “Optical Illusion” Fix (Best for Fully Dried Glue)
This is the simplest solution when the nail is only a little crooked but firmly attached. Instead of trying to reposition the adhesive, you adjust the artificial nail’s outline so that it appears more centered.
Best for: A slightly uneven tip, a minor angle difference, or a nail that visually leans to one side without causing discomfort.
How to File a Crooked Press-On Nail
- Identify the uneven side. Look directly at the nail and determine which edge creates the crooked appearance.
- Use a fine-grit file. Work only on the artificial nail, keeping away from the natural nail and surrounding skin.
- Refine the visually lower edge. File a tiny amount at a time to help correct the apparent angle.
- Balance the opposite edge. Make small adjustments until the nail appears more symmetrical.
- Check the result from above. Rest your hand on a table and compare the nail’s visual center with the finger.
- Smooth the free edge. Remove rough spots that might catch on clothing or hair.
The goal isn’t to remove large amounts of material. Small adjustments can make a noticeable difference, especially on shorter nails.
How to Fix Different Nail Shapes
Square nails: Keep the tip straight while making small adjustments to the corners. If you prefer this shape, explore our square press-on nails guide for shape inspiration.
Oval or almond nails: Gently rebalance the curved sides so the tip looks centered. For softer silhouettes, see our oval press-on nails collection.
Coffin nails: Maintain the tapered sides and straight free edge, removing only a small amount where needed.
If filing would make the nail too narrow or noticeably uneven, stop. It’s better to remove and reapply the press-on than to overfile it.
Method 2: The Warm Water & Oil Lift (Best for Semi-Fresh Glue)
If the press-on is recently attached or held with adhesive tabs, warm water and oil may help loosen the adhesive. This method is gentle, although it won’t reliably release every type of fully cured liquid nail glue.
What You’ll Need
- A bowl of comfortably warm water
- A few drops of mild dish soap
- Cuticle oil or olive oil
- A clean towel
- A wooden orange stick, used only after the adhesive has loosened
Step-by-Step Instructions
- Prepare the bowl. Fill it with comfortably warm water and add a few drops of dish soap.
- Apply oil. Massage cuticle oil or olive oil around the base and sides of the press-on.
- Soak the fingertip. Leave it in the warm soapy water for approximately 10–15 minutes.
- Check the adhesive. Gently test the nail using your fingertips without pulling upward.
- Lift only if it releases naturally. If an edge is already loose, a wooden orange stick may help guide the detached edge. Never wedge it under firmly bonded glue.
- Repeat rather than force. If the nail doesn’t release, continue soaking or move to a removal method approved for your adhesive.
- Clean and reapply. Remove remaining adhesive, dry the natural nail thoroughly, and reapply with fresh adhesive.
Important: Don’t use a hairdryer to heat the press-on or attempt to bend it into position while firmly glued. Heat can distort some artificial nail materials without safely loosening the bond.
To help avoid lifting after reapplication, check our guide on how to make press-on nails last longer, including preparation and adhesion considerations.
Method 3: The Targeted Acetone Soak (The Last Resort)
When liquid nail glue remains firmly attached, an acetone-based removal method may be necessary. However, pure acetone can soften, cloud, or dissolve certain artificial nail materials, so it may not be possible to preserve the press-on for reuse.
Always follow the instructions supplied with your specific nail glue or press-on set.
How to Use Acetone Carefully
- Prepare a ventilated area. Keep acetone away from flames, sparks, and heat.
- Protect surrounding skin. A little petroleum jelly around the skin may help limit dryness; avoid applying it directly to the glue seam.
- Apply acetone precisely. Use a cotton swab lightly moistened with pure acetone along an accessible adhesive seam near the base or sides of the press-on.
- Allow time for the remover to work. Follow the product manufacturer’s directions.
- Test gently. Check whether the nail is releasing with light fingertip movement. Never pry upward.
- Use a compatible full removal method if necessary. A targeted application may not reach enough of the glue to release a strongly bonded nail.
- Clean and moisturize. Wash your hands after removal and apply cuticle oil or moisturizer.
The American Academy of Dermatology notes that artificial nail application and removal can contribute to nail damage. Gentle handling is especially important when the natural nail feels weak or irritated.
If you notice pain, bleeding, swelling, redness, or separation of the natural nail from the nail bed, stop attempting home removal and seek appropriate professional care.
What NOT to Do When a Press-On Nail Is Crooked
A crooked press-on can be frustrating, but trying to fix it too aggressively can turn a small cosmetic problem into nail damage.
- Don’t pull it off forcefully. This can remove layers from your natural nail.
- Don’t pry with metal tools. They can scratch or injure the nail underneath.
- Don’t twist a firmly glued nail. The artificial nail may crack or pull on your nail bed.
- Don’t use excessive heat. This can damage the press-on and surrounding skin.
- Don’t add glue into a dirty, lifting gap. Remove and properly prepare the nail before reapplication.
- Don’t ignore discomfort. A painful, lifting press-on should be assessed rather than cosmetically disguised.
How to Prevent Crooked Press-On Nails Next Time
Preventing crooked press-ons starts before the adhesive touches your nail. Proper sizing, alignment, and controlled pressure help the artificial nail sit in a more natural-looking position.
Trick 1: The 45-Degree Cuticle Alignment
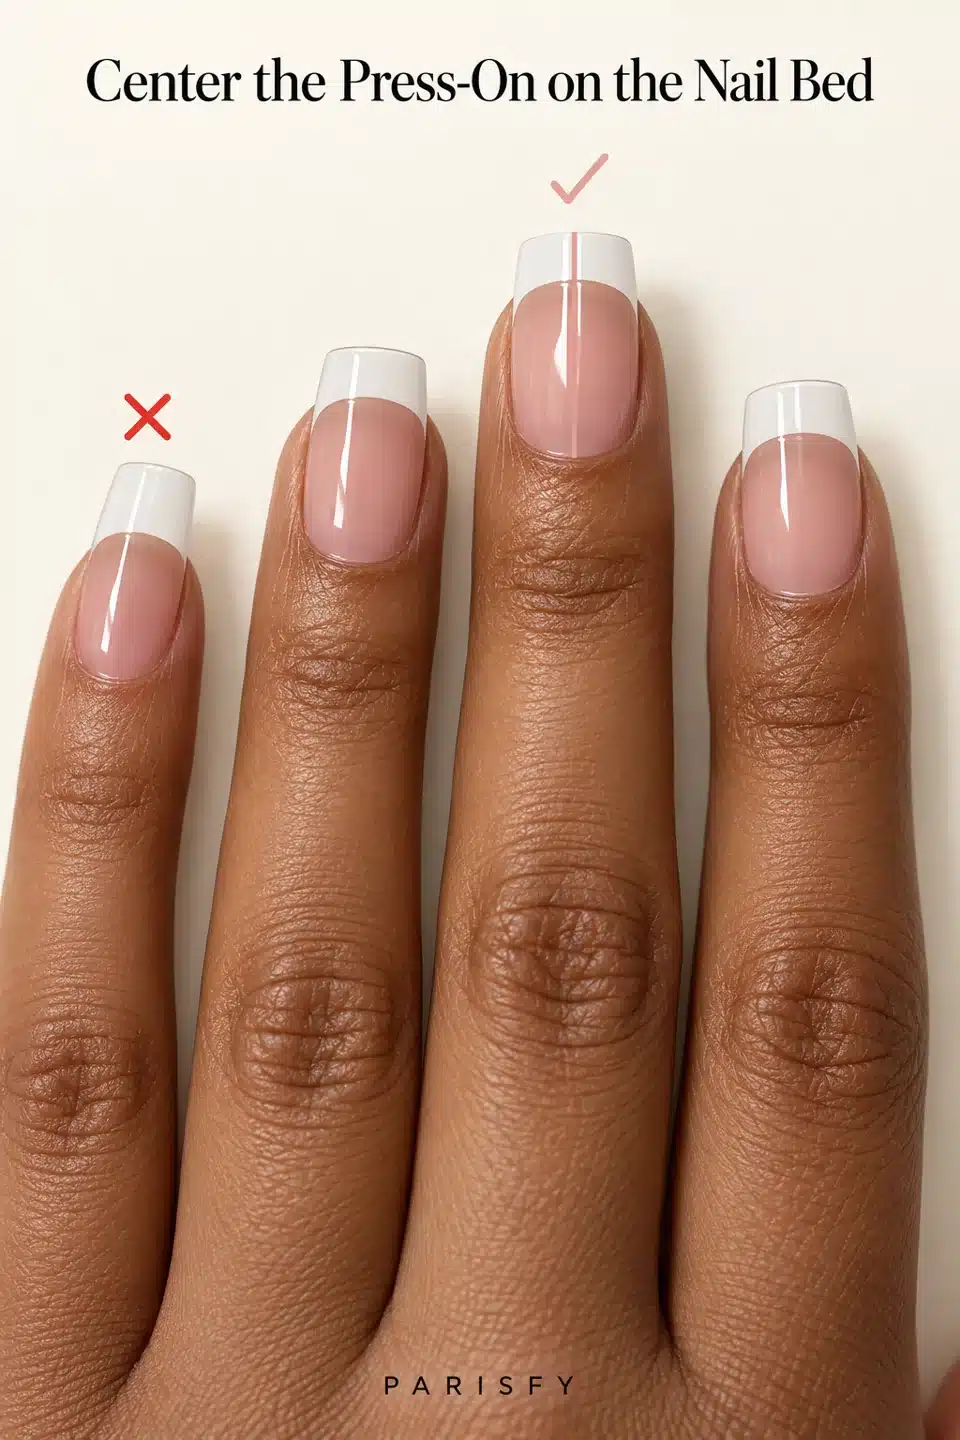
- Choose a press-on that fits your natural nail from sidewall to sidewall without overlapping the skin.
- Hold it at approximately a 45-degree angle, with the base close to the cuticle line but not on the skin.
- Check the nail’s center against the central axis of your finger, rather than judging only by the fingertip.
- Lower the press-on gradually from the cuticle area toward the free edge.
- Confirm the alignment before the adhesive sets.
- Press firmly for the time recommended by the adhesive manufacturer.
Don’t rely on a last-second twist to correct placement once fast-setting glue begins to bond.
Trick 2: Use Clear Press-On Nail Clips
Clear press-on nail clips may help maintain steady, even pressure during application when they’re compatible with your adhesive and nail shape.
- Align the nail before applying the clip.
- Use gentle, comfortable pressure.
- Check that the clip isn’t pushing the nail off-center.
- Never use a clip that pinches or causes pain.
- Remove it according to the adhesive manufacturer’s guidance.
Clips may help hold an aligned press-on in place, but they won’t straighten an incorrectly positioned nail after the glue has cured.
Trick 3: Choose the Right Size and Shape
A nail that’s too wide can overlap the skin, while one that’s too narrow may look uneven. Match the curve and width of the artificial nail to your natural nail before applying adhesive.
If you’re new to press-ons, shorter shapes can be easier to position. Our short press-on nails guide covers manageable lengths, while extra short press-on nails are another option for a more understated manicure.
For a subtle, realistic finish, explore natural press-on nails and choose a shape that closely follows your existing nail outline.
Your Crooked Nail Rescue Kit
A small nail kit makes it easier to handle minor mistakes without rushing through the repair.
- Fine-grit nail file
- Cuticle oil or olive oil
- Warm water and mild dish soap
- Wooden orange stick
- Fresh adhesive tabs
- Compatible nail glue or nail-glue remover
- Acetone, if permitted by the product instructions
- Clean towel and moisturizer
- Optional clear press-on nail clips
For a minor alignment issue, start with the file. For a severely crooked or uncomfortable nail, use the appropriate adhesive removal method and reapply it correctly.
Related Press-On Nail Guides
Once you’ve corrected the crooked nail, the next step is making sure your manicure stays comfortable and well aligned.
How to Keep Press-On Nails Lasting
Proper nail preparation and correct adhesive application help improve the appearance and wear of your manicure. Read How to Make Press-On Nails Last Longer for more practical care tips.
How to Take Press-On Nails Off Without Force
If the press-on cannot be safely reshaped, careful removal matters more than saving the artificial nail. Review our reusable press-on nails guide for more on reusable designs and their care.
How to Apply Press-On Nails for a Straighter Finish
Choosing an easy-to-align style can make application more straightforward. For a classic manicure, see our best French tip press-on nails guide or explore short French tip press-on nails.
Frequently Asked Questions
Can you file a press-on nail if it’s crooked?
Yes. If the glue is completely set, gently filing the artificial nail’s sides and free edge can make a slightly crooked press-on look straighter. Avoid filing the natural nail or excessively thinning the artificial tip.
Will pulling off a crooked press-on nail damage my natural nail?
Yes. Forcefully removing a bonded press-on can strip layers of natural nail keratin. Loosen or dissolve the adhesive with a method compatible with your glue or tabs, and never pry when you feel resistance.
How do you align press-on nails perfectly straight?
Position the press-on near the cuticle at roughly a 45-degree angle, align its center with your finger’s central axis, then lower it carefully. Press for the time recommended by the adhesive manufacturer.
Bottom line: A crooked press-on nail doesn’t automatically mean starting your manicure over. If it’s only slightly uneven, a few careful filing adjustments may solve the problem. If it’s badly positioned, loosen the adhesive and reapply it rather than risking damage to your natural nail.


